Desktop Windows Manager high GPU usage can cause performance issues and slowdowns on your PC.
Game lagging, graphic stuttering and random Windows shutdowns are some of its effects.
If you’re experiencing high GPU usage on your Desktop Window Manager (DWM), you are not alone.
Here’s a typical scenario of the DWM.exe GPU utilization spike lamented by a user on the Microsoft platform.
Out of nowhere, Desktop Windows Manager is using almost 90-100% of all my GPU.
I tried decreasing its priority, tried to adjust appearance to best for performance, tried everything!
Need help!
In this article, we’ll explore the causes of Desktop Window Manager (DMW.exe) high GPU usage, Its effect on your device and some proven fixes to resolve it.
In this article:
What Causes Desktop Window Manager High GPU Usage?
Several Hardware and Software issues could lead to Desktop Window Manager high GPU usage, including outdated graphics card drivers, incompatible applications, excessive visual effects, or malware infections.
- Hardware problems, such as faulty graphics cards or inadequate cooling, can result in high GPU usage.
- Overheating, damaged components, or improper GPU installation can all contribute to increased GPU load and strain.
- Resource-intensive games and apps can strain the GPU and lead to high usage.
- Some malware consumes significant system resources, including GPU power.
- Outdated or incompatible drivers can result in inefficient GPU usage and increased GPU load.
- Out-of-date Windows version may lead to compatibility issues with the graphics driver or the DWM itself.
- Corrupted or damaged system files related to the DWM or GPU drivers can lead to high GPU usage.
How Do I Fix Desktop Window Manager High GPU Usage?
1. Update Windows to the Latest Version
- Press Windows + I hotkeys on your keyboard to open the Settings app.
- On the Settings screen, go to Windows Update on the left sidebar and click Check for Updates in the right pane.
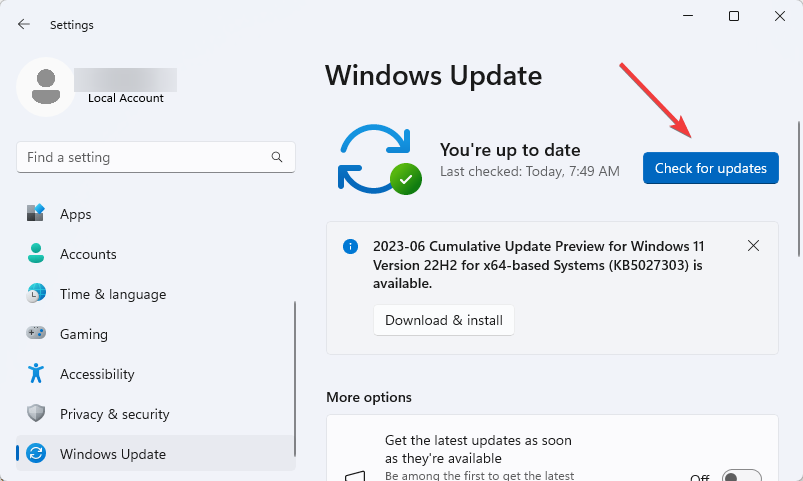
- Windows automatically download updates and asks you to restart your PC to complete installation.
Windows updates often include bug fixes and performance improvements that can address high GPU usage issues.
If the GPU usage is still high, the next fix to try is to reset Windows to factory settings. Factory resetting to the original default wipes all data and settings on your PC and clears any errors.
Before resetting your PC, you should back up all your files to avoid losing important data.
2. Reset PC to Factory Settings
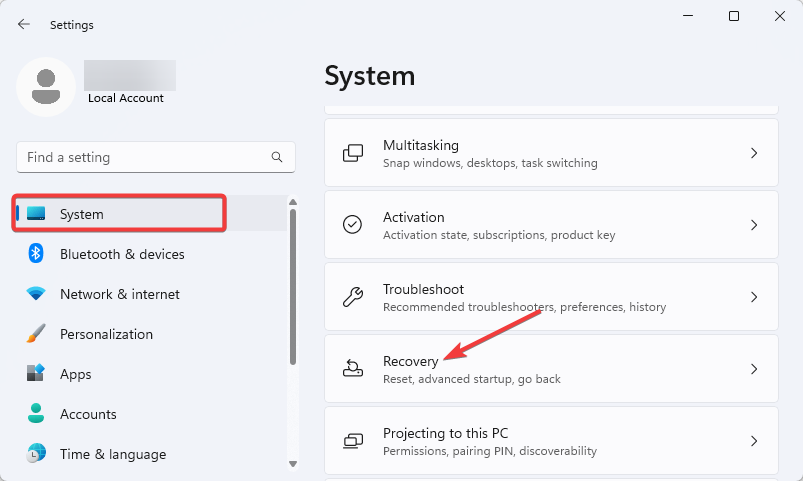
- Press Windows + I on your keyboard to open Settings, go to the System tile on the left sidebar, then click on Recovery on the right pane.
- Next, click the Reset PC button next to Reset this PC.
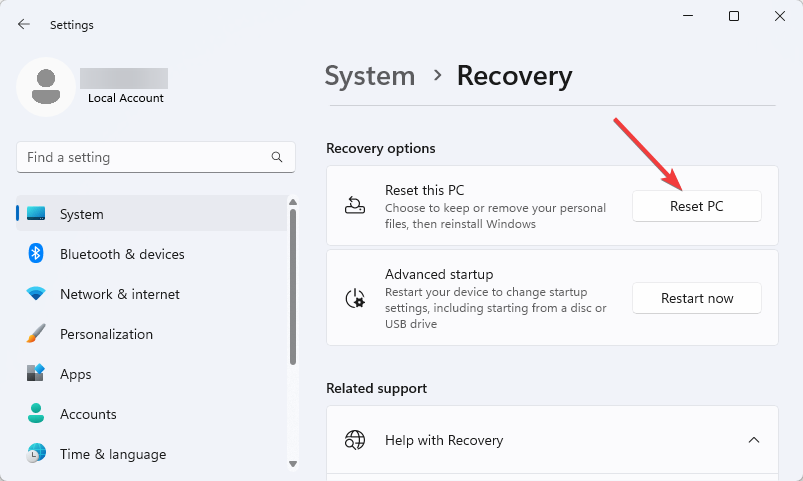
- Choose Keep My Files to reset all system settings default without removing personal files.
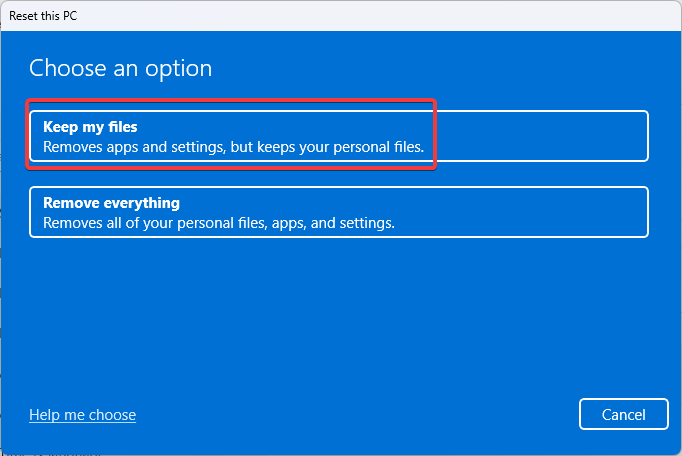
- Follow the on-screen instruction to complete the process.
3. Update Graphics Drivers
- Open the Start menu by pressing the Windows key. Type Device Manager in the search bar and click Open on the result page.
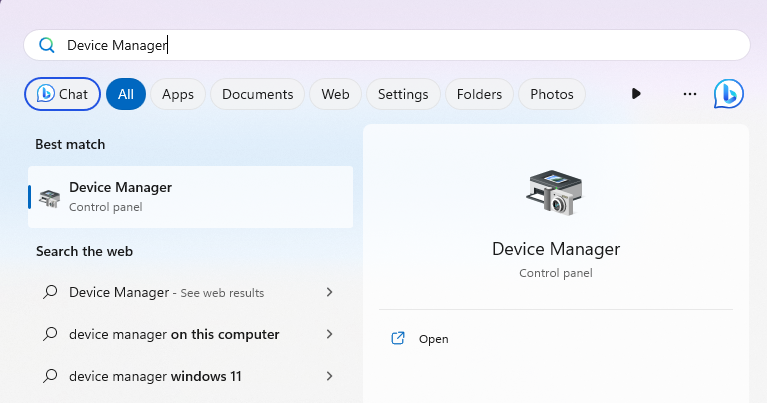
- Locate Display Adapters and double-click to expand it. This will reveal all installed graphics drivers on your computer.
- To update your driver, right-click on it and select Update Drivers from the resulting options. You’ll be prompted to select the update options you prefer.
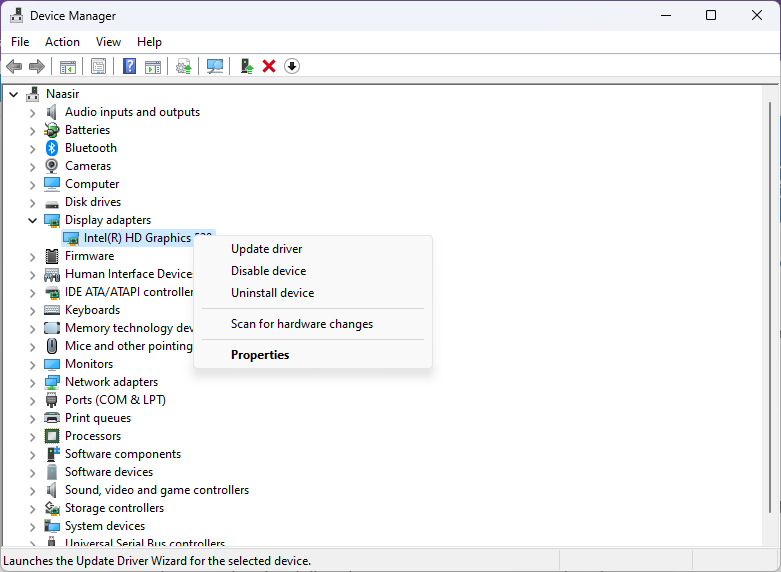
- Choose Search automatically for drivers to update. You can choose the Browse my computer for drivers option to update the drivers manually.
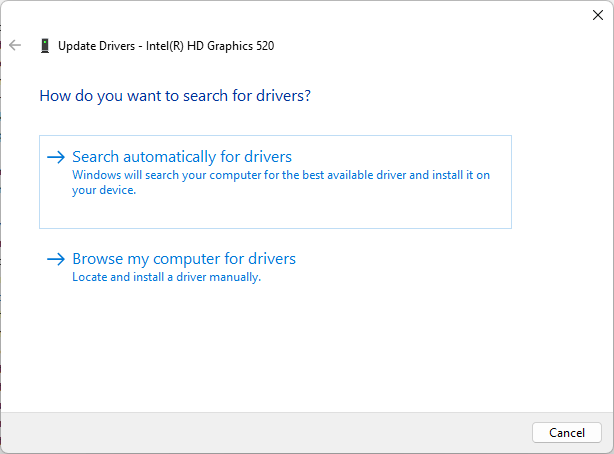
- Windows will automatically update the driver and notify you upon completion. If you choose the manual option, follow the on-screen prompt to complete the process.
Desktop Window Manager’s high GPU usage can occur with outdated graphics, so keeping drivers up to date is important.
If you start seeing high GPU usage after updating the graphic drivers, you can roll back your driver to its previous stable version. See how to do that below.
4. Roll Back Graphic Drivers
- Navigate to the Device Manager Windows as above. Double-click to expand Display adapters, right-click on the Graphic driver and select Properties from the options.
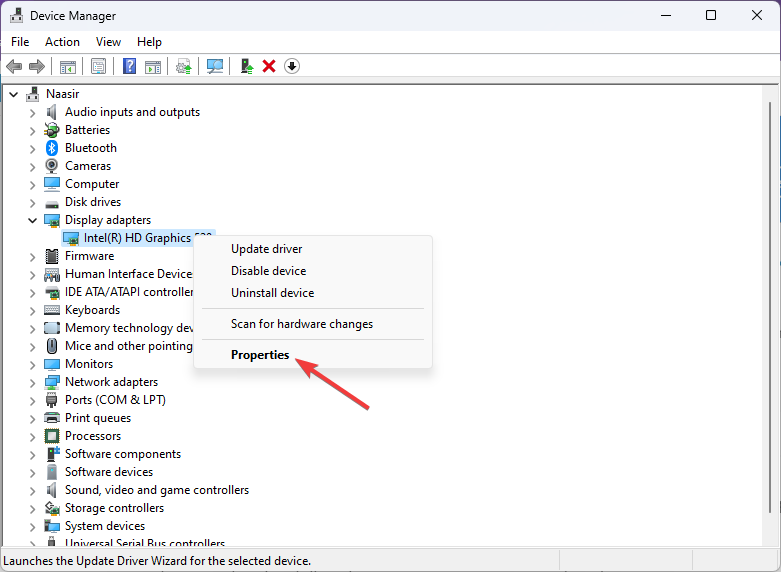
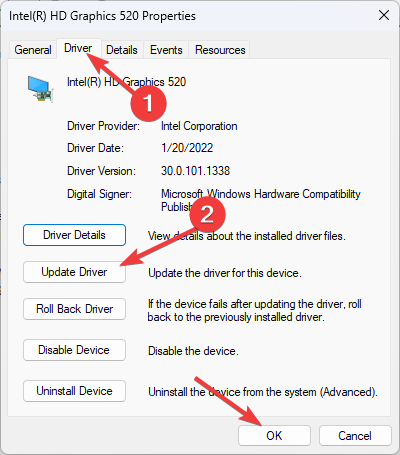
- Next, switch to the Driver tab, select Roll Back Driver from the options, and click OK. This option will be greyed out if no rollback is available for the selected driver.
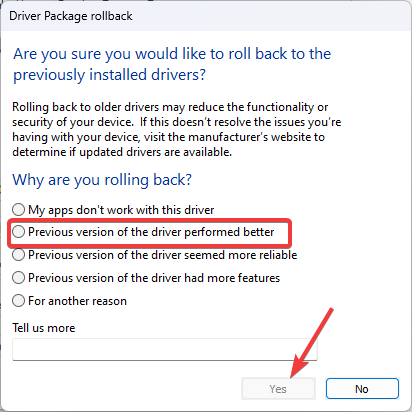
- A Driver package rollback confirmation dialogue will come up. Choose any option and hit the Yes button.
- Once done, restart the computer, and everything will work fine afterward.
If the issue persists, another way to resolve high GPU usage caused by outdated or corrupt drivers is to uninstall and reinstall your graphics driver.
5. Uninstall and Reinstall Your Graphics Driver
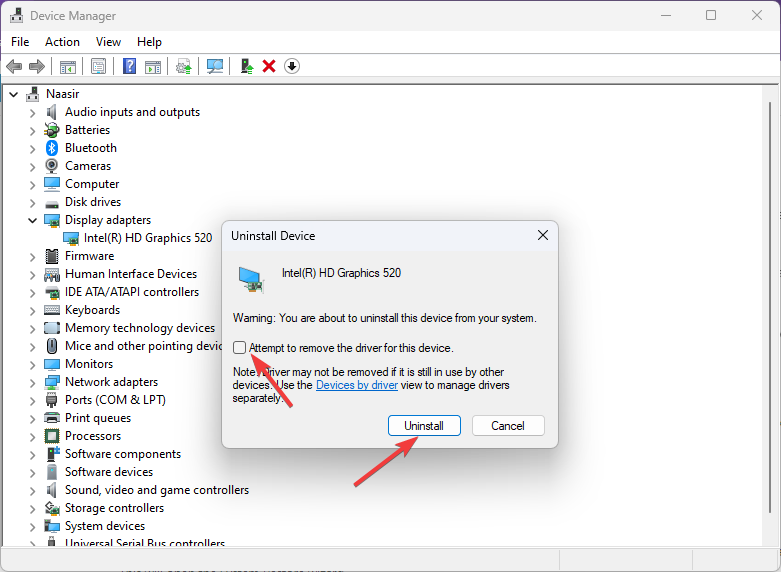
- As in solutions 3 and 4 above, open Device Manager, go to the Display Adapters section and right-click to expand to see your graphics driver. Right-click on it and select Uninstall device from the available options.
- A confirmation window will pop up. Check the box that says Delete the driver software for this device and click Uninstall to proceed.
- Once the installation is complete, restart your computer, then press the Window + I keys to open Settings. Alternatively, press the Windows Start button and select Settings from the menu.
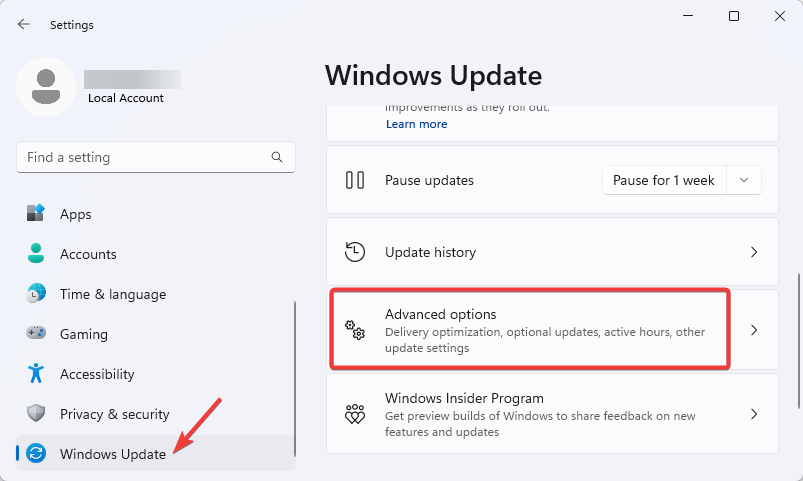
- Now, click on Windows update at the bottom of the left sidebar and select Advanced options.
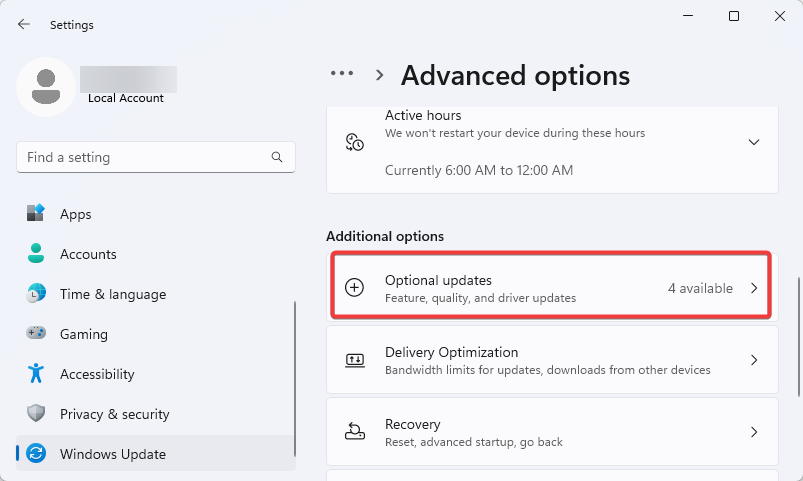
- On the next screen, scroll to the Optional Update section.
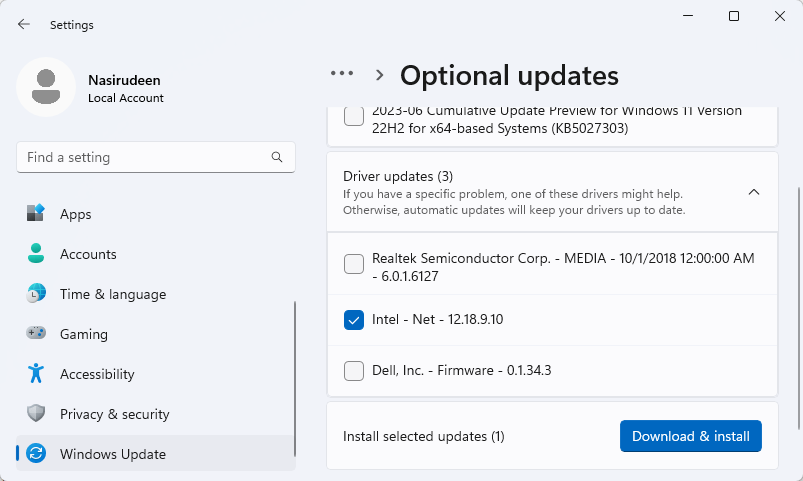
- Expand the Driver updates tab, check the box next to your graphics driver and then click on the Download & Install button.
- Wait for the update to complete. After that, restart your PC and check if the issue has been resolved.
6. Perform System Restore
- Press Windows Key + R to open the Run dialog box, the type
rstruiand the command box and hit Enter on your keyboard.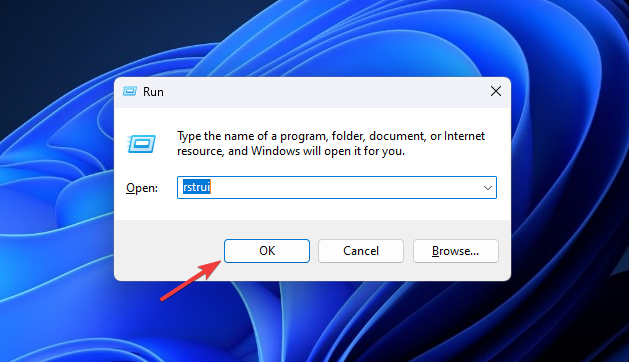
- The System Restore wizard will open. Click the Next button to proceed.
- You’ll see a list of available restore points with their dates and descriptions. Select a restore point that predates the appearance of high GPU usage on your PC and click the Next button. You can click Scan for affected programs to see the detailed list of what the restore will affect.
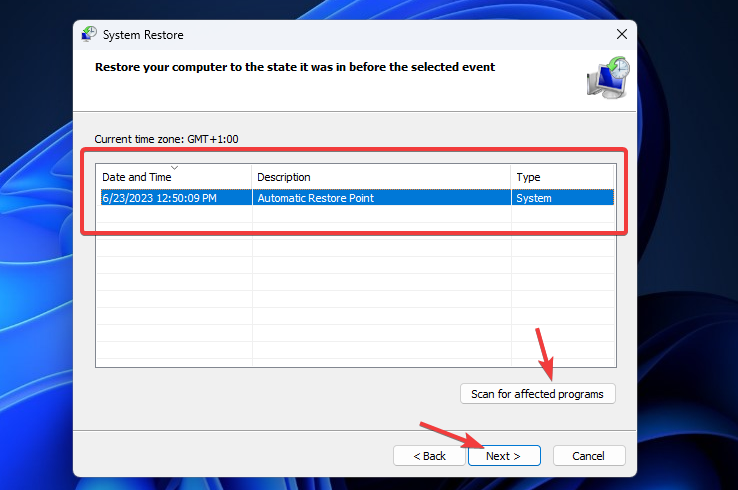
- Next, click Finish to confirm your restore point selection and initiate the system restore process.
Your computer will restart, and the restoration process will begin. It may take some time to complete. Upon completion, your computer will restart again, and Windows will inform you if the restore was successful.
System Restore is a feature in Windows that allows you to revert your computer’s system files, settings, and installed applications to a previous state.
It undo any changes or issues that may have caused high GPU usage by the Desktop Window Manager (DWM). It can be particularly useful if you recently installed a driver or software or changed some of your system settings.
7. Run SFC, DISM, & CHKDSK Commands
- Press Windows + X shortcut keys and select Terminal (Admin) from the menu. If prompted for permission, click Yes. to proceed.
- You may be prompted to enter the administrator password if you aren’t logged in with an admin account. Enter the credentials to proceed. This will open Windows PowerShell Command Prompt.
- Now, to run the SFC scan, type the following command and press Enter:
sfc /scannow. The scanning will take some time.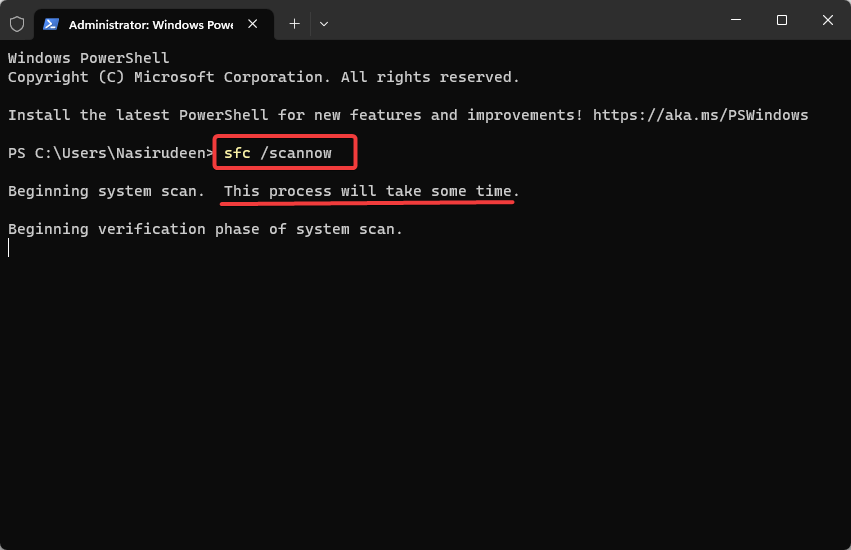
- Once complete, run the DISM scan by typing the following command and press Enter:
DISM /online /cleanup-image /restorehealth.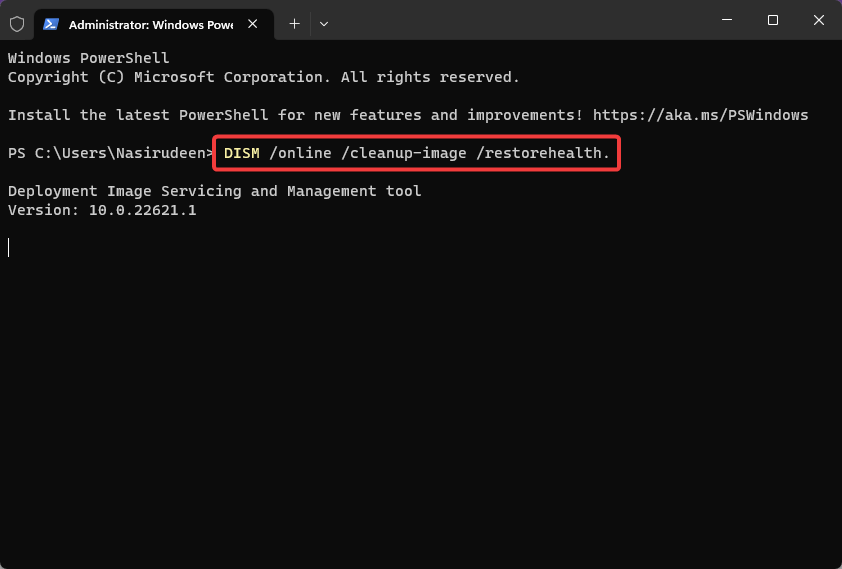
- Lastly, run the CHKDSK scan by pasting the following command and press Enter:
chkdsk /f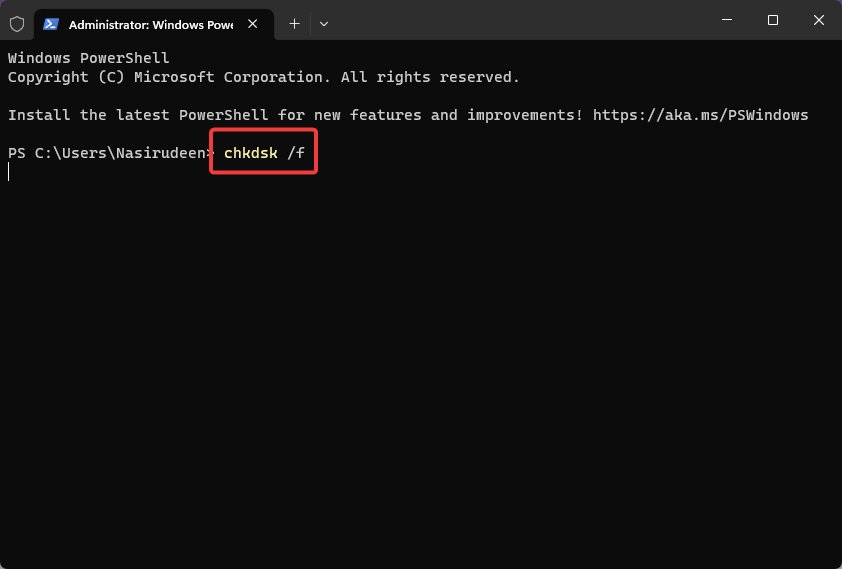
- You’ll be prompted that Chkdsk cannot run because the volume is in use by another process. To schedule the scan at the next system restart, type Y and hit Enter.
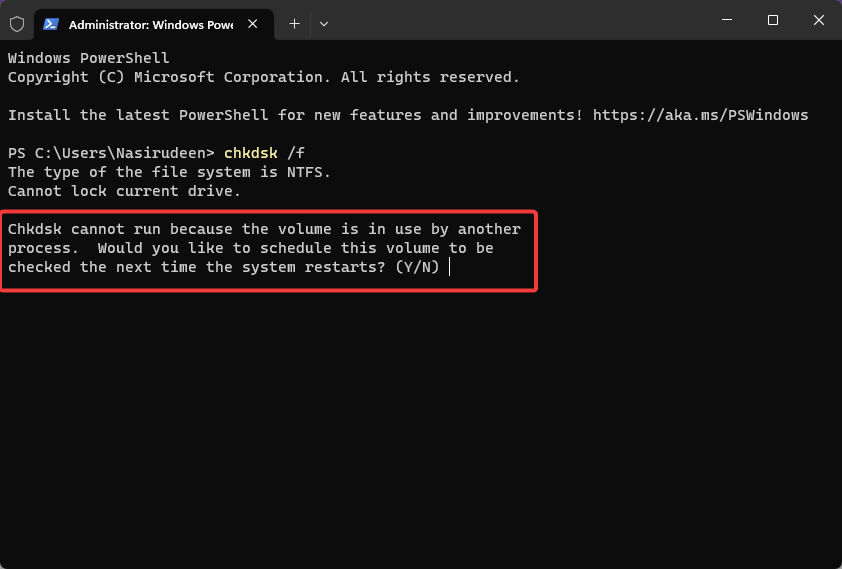
- Restart your computer for the scan to run.
Running the System File Checker (SFC), Deployment Image Servicing and Management (DISM), and Check Disk (CHKDSK) commands can help fix Desktop Windows Manager high GPU usage.
Here’s what each of these commands does:
- System File Checker (SFC): The SFC command scans your system for corrupt or missing system files and attempts to repair them. It uses a cache of system files to replace any damaged or incorrect files it finds.
- Deployment Image Servicing and Management (DISM): The DISM command is used to repair and prepare the Windows system image for system recovery. It fixes issues with Windows Update, including corrupt system files.
- Check Disk (CHKDSK): CHKDSK is a command-line tool that checks the integrity of your hard disk and fixes errors, including bad sectors. Running CHKDSK can help identify and resolve issues related to file system corruption that may be impacting system performance.
8. Turn Off Hardware-accelerated GPU Scheduling
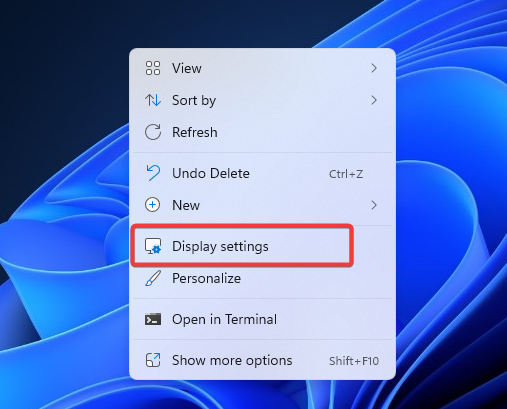
- Right-click on any blank section on your desktop and select Display settings from the context menu.
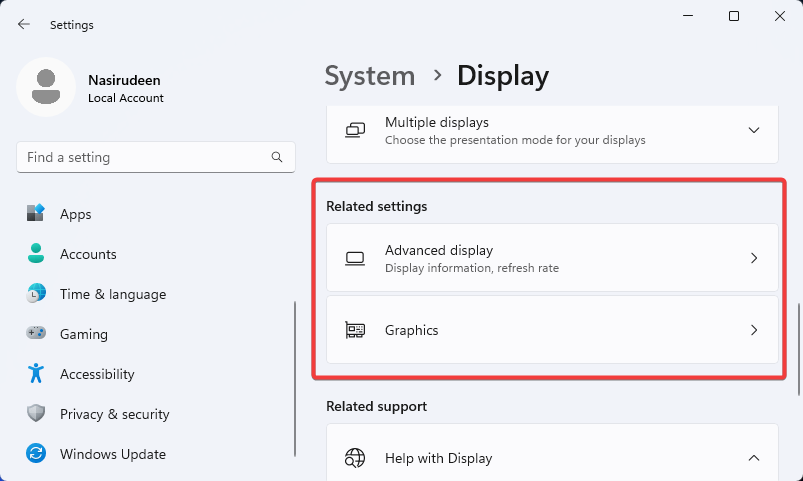
- In the Display settings window, scroll to the Related settings section and click on Graphics settings under it.
- In the Graphics settings window, click Change default graphics settings.
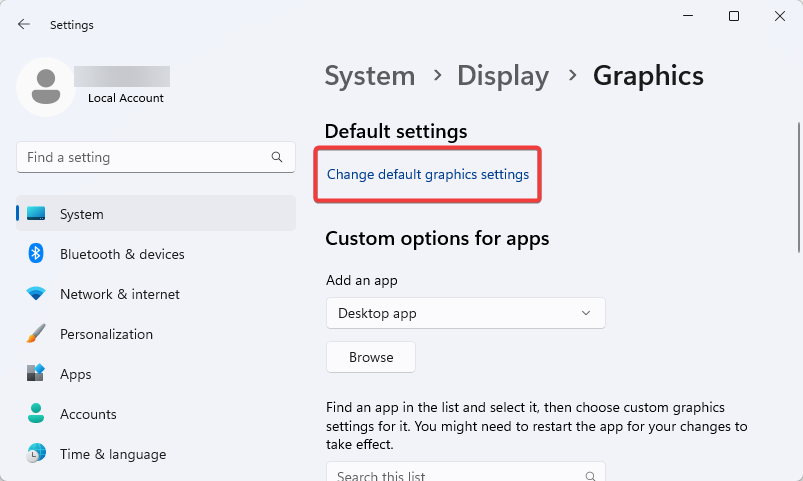
- You should see the Hardware-accelerated GPU scheduling or Optimization for windowed games in some versions of Windows. Toggle OFF the switch under it.
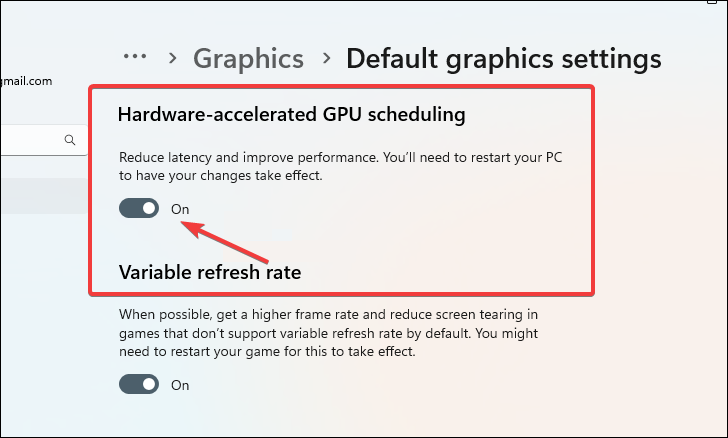
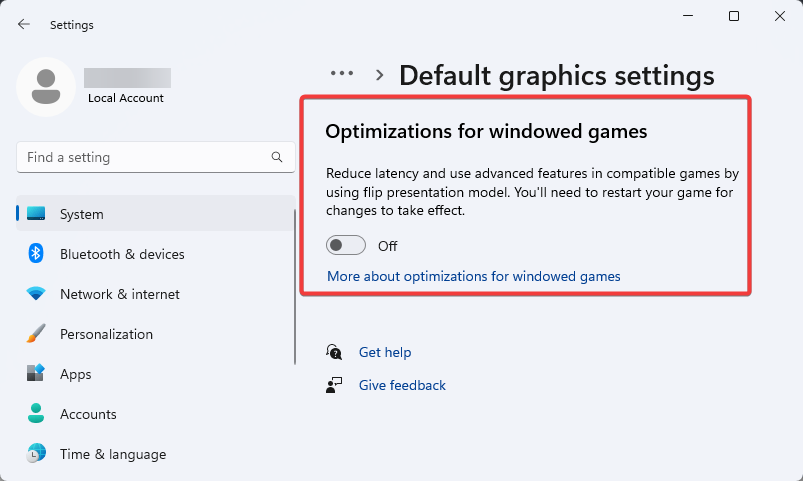
- After turning off hardware-accelerated GPU scheduling, restart your computer to apply the changes.
Hardware-accelerated GPU scheduling is a feature introduced in Windows 10 that allows the GPU to manage its own video memory, task scheduling, and synchronization.
While this feature can improve overall GPU performance and efficiency when gaming, it can cause issues, including high GPU usage by the Desktop Window Manager (DWM) when not.
Disabling hardware-accelerated GPU scheduling can help alleviate such issues.
9. Disable the Fast Startup
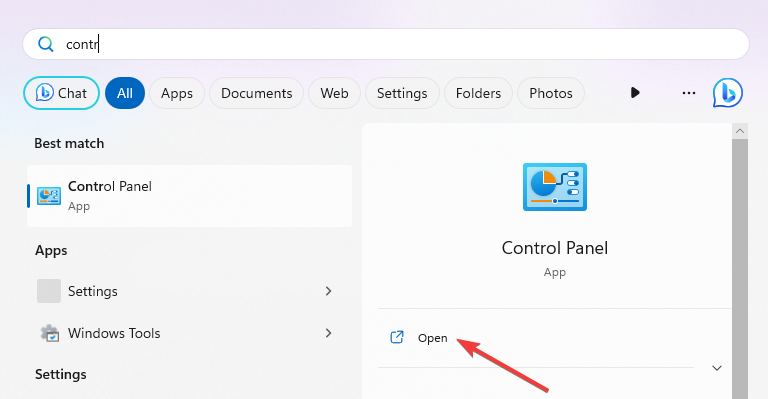
- Press the Windows key on your keyboard, type Control Panel in the search, and click Open on the result page.
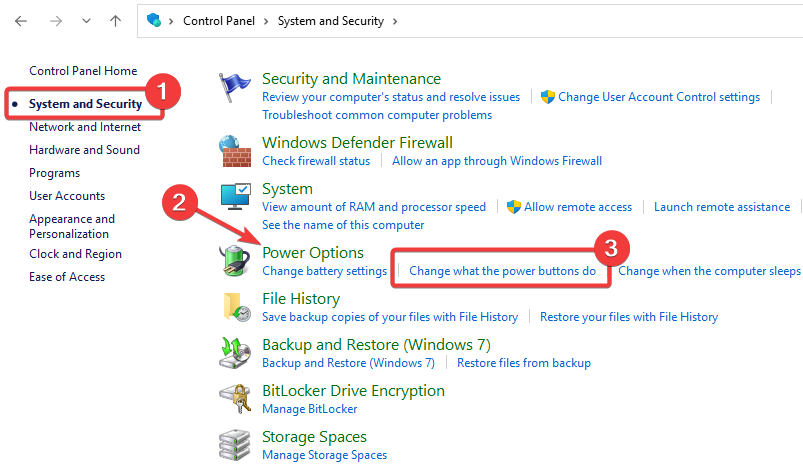
- On the control panel window, select System and Security, then Power Options and click Change what the power buttons do under it.
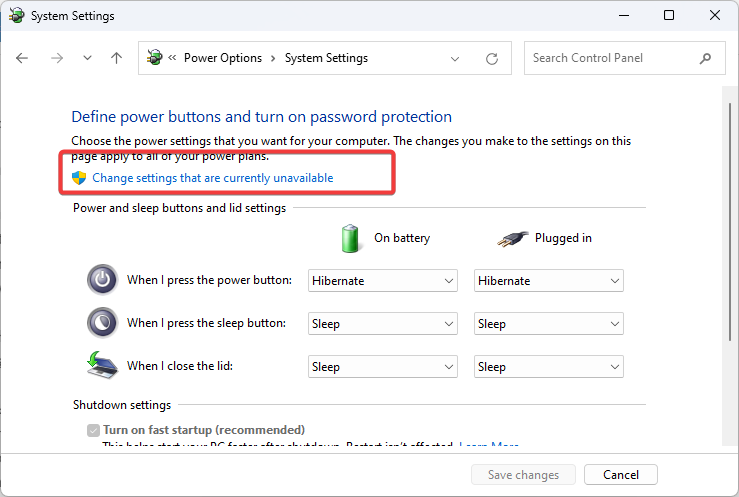
- On the next screen, click Change settings that are currently unavailable.
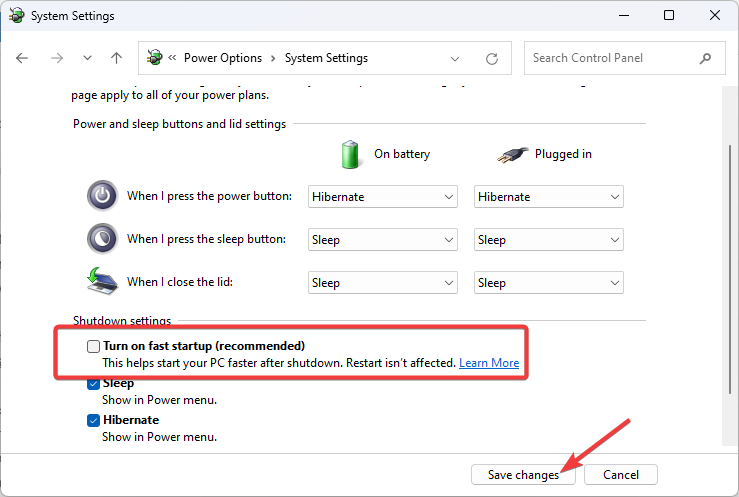
- Under the Shutdown settings, check the box next to Turn on fast startup (recommended) and select Save changes.
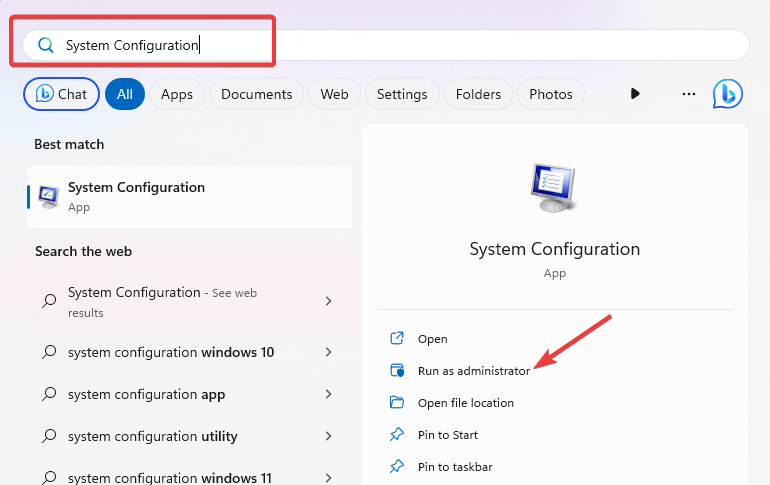
- After that, press the Windows key, type System Configuration in the search bar and select Run as administrator on the result page.
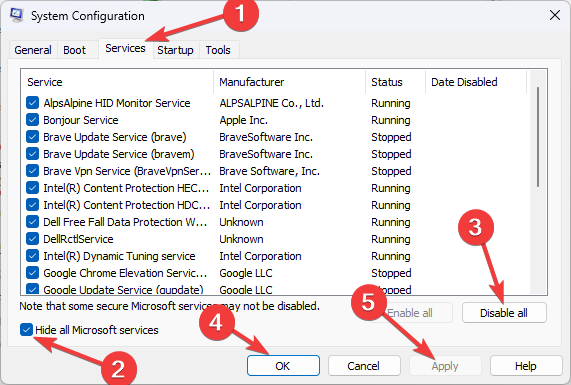
- Switch to the Services tab, tick the Hide all Microsoft services checkbox, and hit the Disable all button. Finally, click OK and Apply.
- For the changes to take effect, restart your computer.
The Fast Startup feature lets your Windows PC start up more quickly by preloading some system data and settings before shutting down.
Although this makes Windows start faster, it can also cause issues because the system often shuts down while the GPU is not fully powered off.
10. Scan For Malware
- Press the Start button, select Settings from the menu, or press the Windows + I shortcut keys to open Windows Settings.
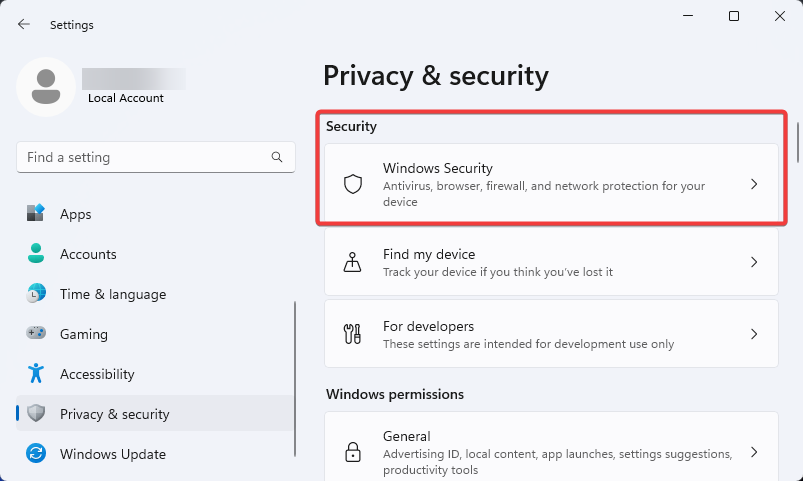
- On the left sidebar, select Privacy & security and then go to Windows Security.
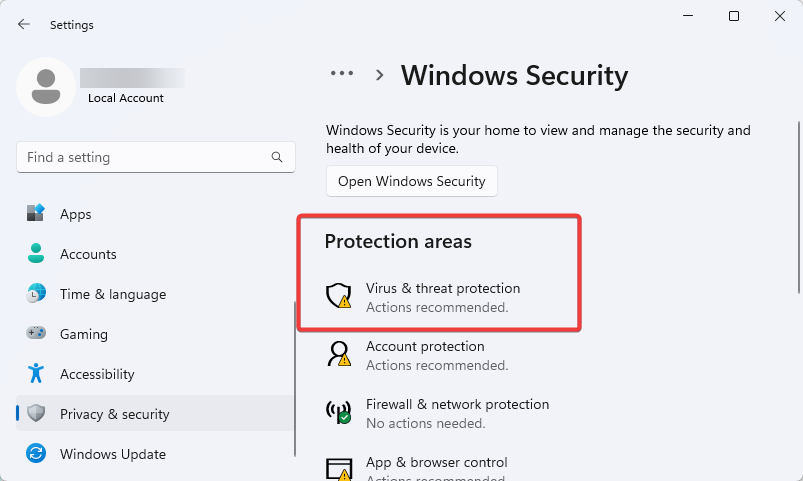
- Next, select Virus & threats protection.
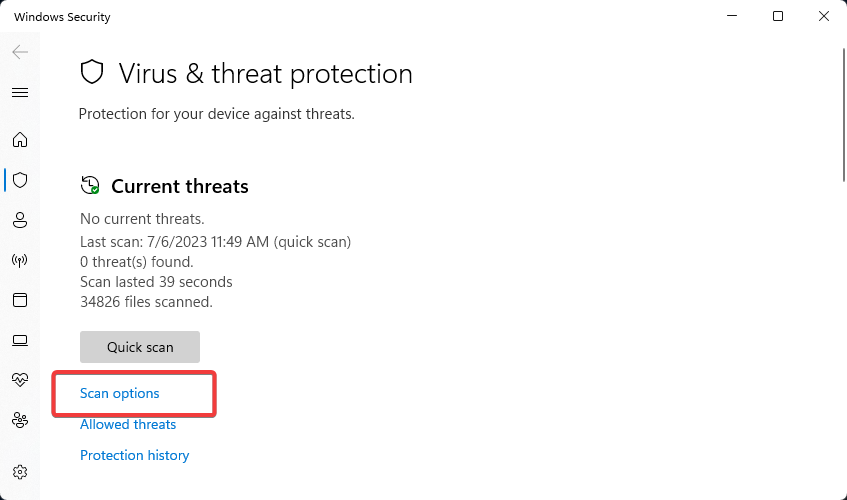
- You’ll see the Quick Scan option. Ignore it and click the Scan options under it.
- Select Microsoft Defender Antivirus Scan from the resulting options, then click the Scan Now button.
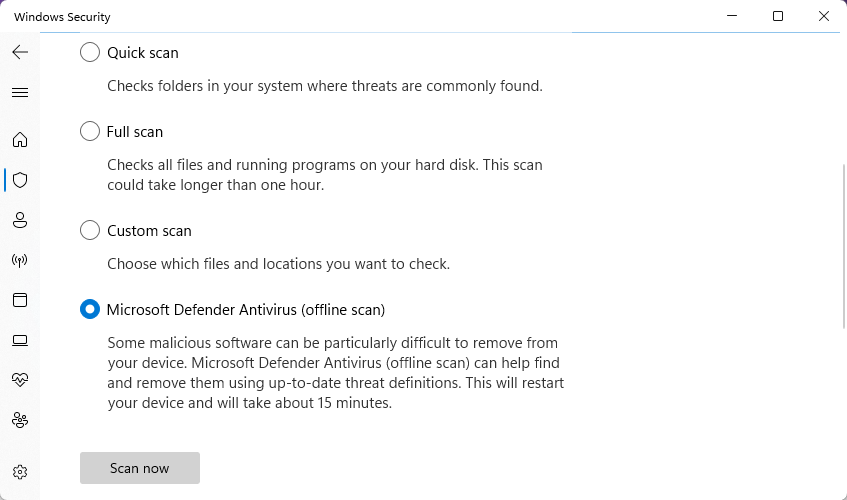
- The scanning will take a while to complete. Windows will scan, check, and fix any malware detected, and your PC will restart afterward.
Alternatively, you can use reliable third-party antivirus software or dedicated malware removal tools.
11. Turn off Visual Effects
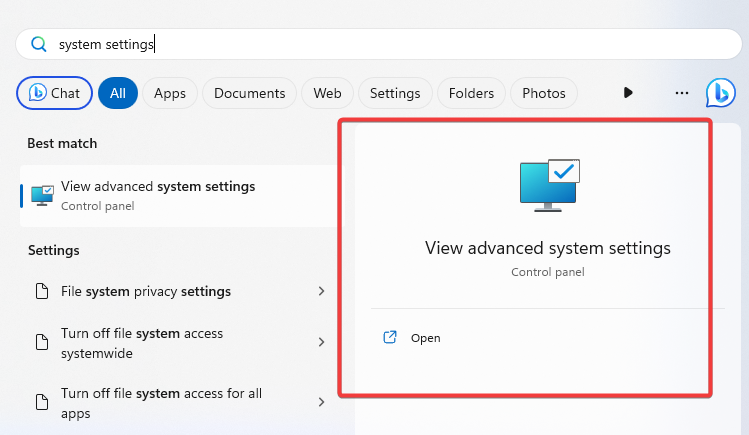
- Type system settings in the Windows search bar. You’ll see View advanced system setting on the result page. Click Open under it.
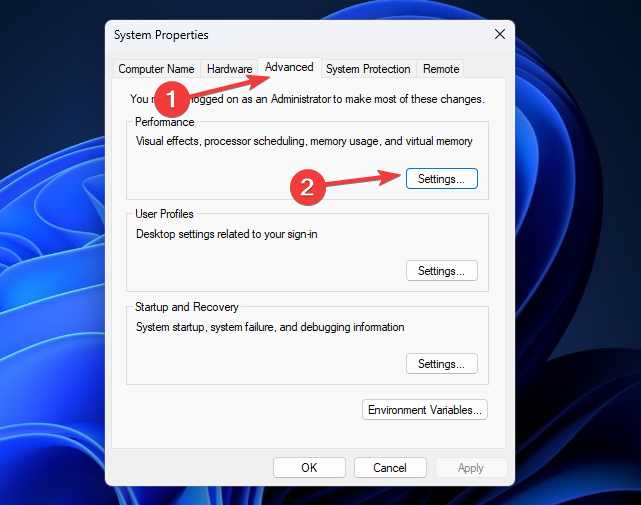
- The System Properties window will appear. Switch to the Advanced tab and click Settings under the Performance section.
- Next, on the Visual Effects tab, choose Adjust for best performance and click Ok to apply changes.
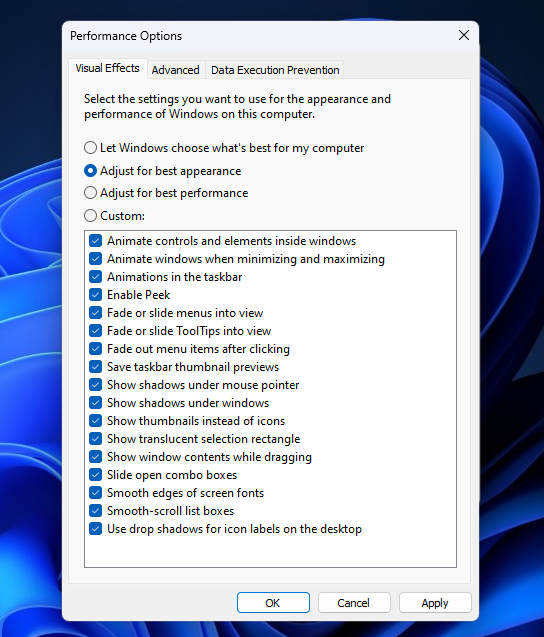
Disabling or reducing the visual effects reduces the workload on the GPU, resulting in lower GPU usage.
How Does High GPU Usage Affect Your PC Performance?
With Desktop Window Manager high GPU usage, here are some performance issues you might notice in your computer:
- Applications and tasks running on your system will become frustratingly sluggish. Stuttering and abrupt shutdown could also set in.
- Higher GPU usage by the DWM means the GPU remains active for longer durations, consuming more power.
- When the GPU is working too hard, it generates more heat.
- As the GPU works harder to handle the increased load, the cooling fans may spin faster, resulting in louder fan noise.
Frequently Asked Questions (FAQs)
Should my GPU be at 100 in Task Manager?
Your GPU can be 100% in Task Manager if you intentionally run tasks that require heavy GPU processing, such as gaming, video editing, or 3D rendering. If you notice that your GPU is constantly running at 100%, then something is wrong.
Desktop Window Manager High GPU Usage: 11 FIXES
High GPU usage can lead to several performance issues on Windows. Hopefully, one of the 11 fixes we covered in this guide should help you resolve high GPU usage caused by DMW.exe.
We hope you find this guide helpful. Let’s hear about your experience with high GPU usage in the comment section below.

