Desperately need to get over random shutdowns on your Windows 11 PC? We got you.
If you run your day on your computer as we do, unexpected shutdowns can be as frustrating as disruptive, especially when you’re in the middle of an important task.
Windows 11 randomly or automatically shutting down may be due to hardware or software failures, including overheating, malware or virus attacks, faulty drivers, and even problems with the Windows Sleep Mode.
This guide looks at the causes of these random shutdowns and provides practical solutions to stop your PC from powering off abruptly.
In this article:
Why Is My Windows 11 PC Shutting Down Randomly?
- Your PC Sleep Mode is malfunctioning.
- Constantly high GPU usage on Windows is also a possible cause.
- When your computer’s CPU or GPU reaches a critical temperature, It’s programmed to shut down automatically to avoid damage.
- Outdated or defective drivers also contribute to frequent PC shutdowns.
- Virus or malware attacks are also possible factors.
How Do I Fix Random Shutdowns on Windows 11?
1. Keep Your PC Temperature in Check
You can prevent random shutdowns on Windows 11 by keeping your GPU and CPU temperature in check to ensure they don’t rise above normal.
When your PC performs heavy tasks, the highest GPU temperature should be between 80-85°C. Anything above can cause it to shut down or even damage some components.
Likewise, the highest CPU temperature for resource-intensive tasks like gaming ranges between 70–80°C (158–176°F). Going above that might crash your PC.
You can check your GPU temperature from the Windows Task Manager.
Simply press Ctrl + Shift + Esc on your keyboard to open the Task Manager.
Scroll to the Performance tab. You’ll see your present GPU’s temperature.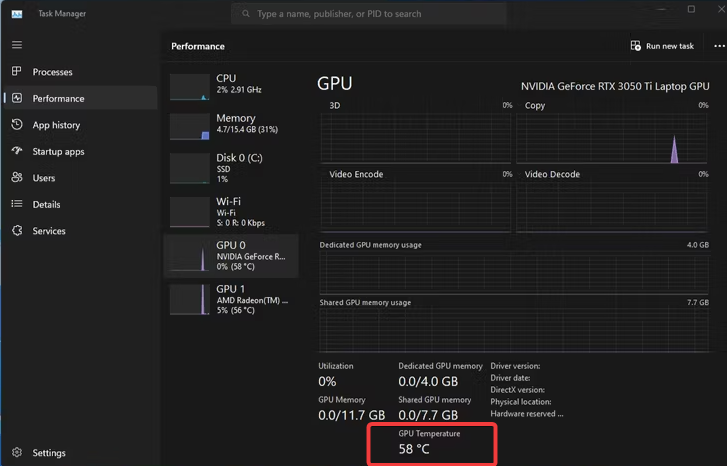
While there’s no easy native way to check CPU temperature on Windows, you can use a third-party tool like RivaTuner/MSI Afterburner.
Download and install the software on your computer.
Once you launch it, you’ll see your CPU temperature on the Afterburner main screen.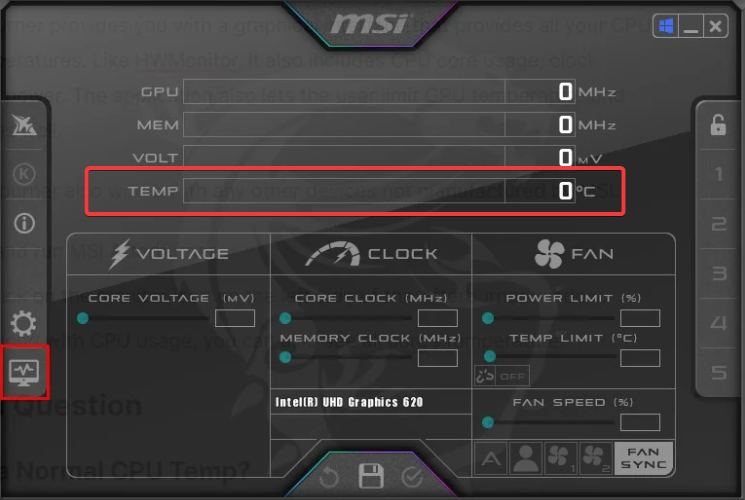
If you discover that your computer is overheating, these tips should help:
- Over time, dust and debris can accumulate on your PC’s air vents and fans, causing overheating. Clean them regularly using compressed air or a soft brush to remove buildups.
- Always use your PC in a well-ventilated area with no objects obstructing airflow.
- If you use a laptop, a cooling pad with built-in fans can help dissipate heat more effectively and can help keep your laptop cooler during intensive tasks.
- Keep your PC away from direct sunlight or other sources of excessive heat, such as radiators or heaters. High ambient temperatures can contribute to overheating.
- The thermal paste between your CPU and its heatsink helps to transfer heat. Over time, it can dry out or degrade. Replace it if you have the experience or feel comfortable doing so. Else, take it to the repair shop.
2. Run Windows Power Troubleshooter
- Open Windows Settings by pressing the Windows + I shortcut on your keyboard. Go to System on the left sidebar, then open Troubleshoot on the right pane.
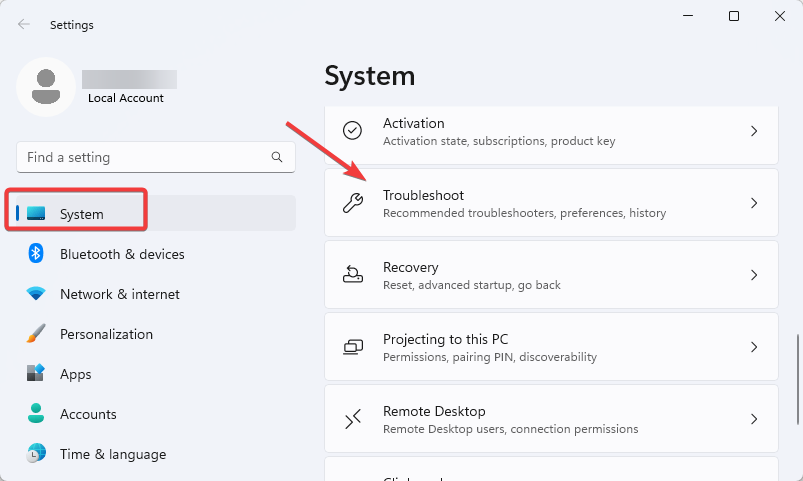
- On the next screen, select Other troubleshooters.
- Next, go to the Power tab and click on the Run button.
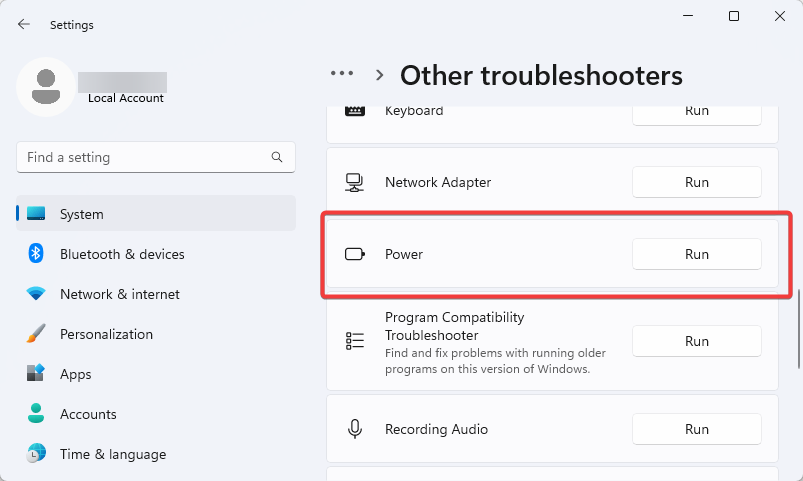
- Windows will start the troubleshooting process to detect the problem, if any. Once detected, follow the on-screen instruction and apply the suggested fixes.
- Restart your PC.
Running the Windows power troubleshooter should fix any misconfigured power settings causing random shutdown on your Windows 11 device.
If the problem persists, you should consider turning off Sleep Mode.
3. Turn off Sleep Mode
- Press Windows + I shortcut keys to open Windows Settings.
- Select System on the left sidebar and scroll down the right pane to click Power & battery.
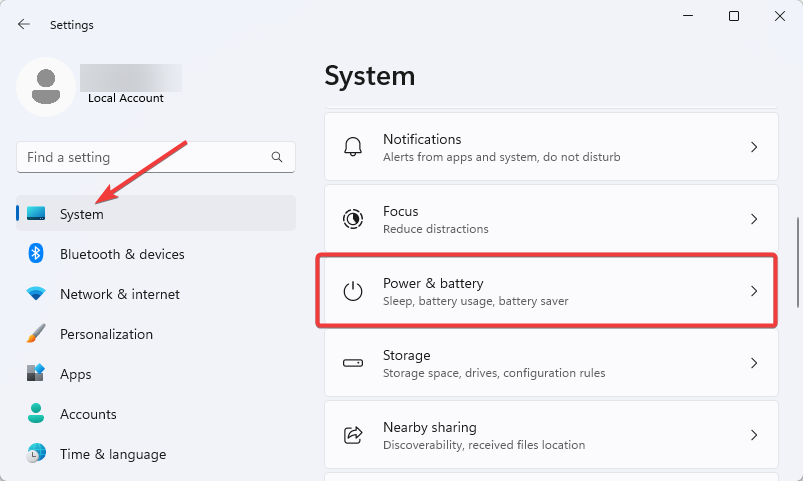
- Under screen and sleep, set On battery power, put my device to sleep after to Never. Likewise, set When plugged in, put my device to sleep after to Never.
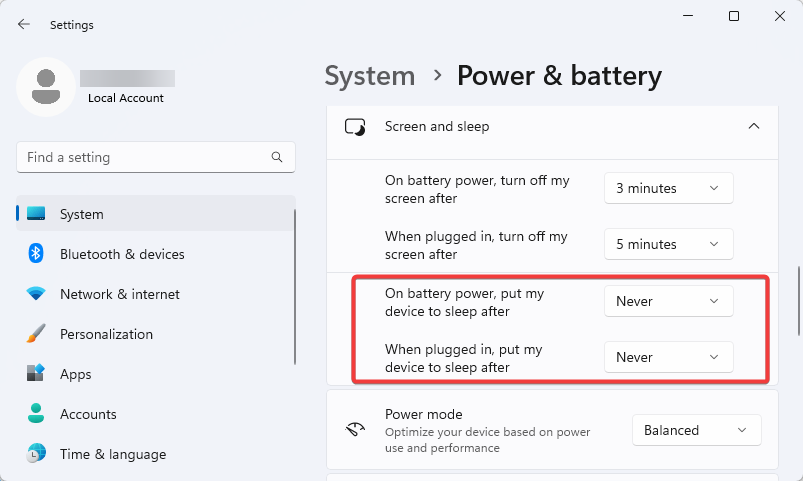
While sleep mode helps users conserve power, putting your system on sleep mode for too long can cause problems like random shutdowns in Windows 11. Disabling it might fix it.
4. Disable Fast Startup
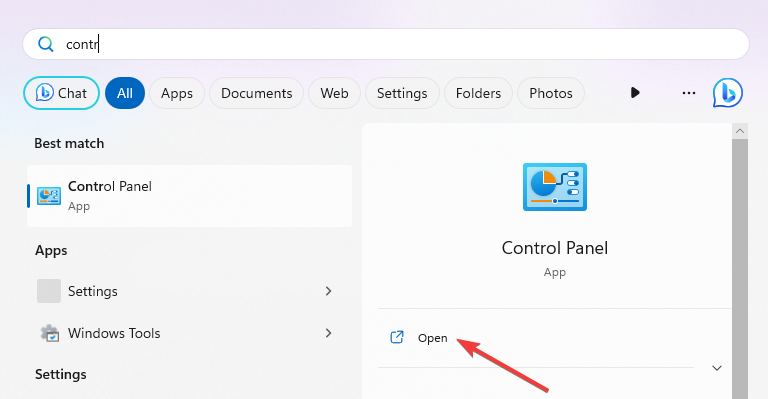
- Press the Start button, type Control Panel in the search, select the Best match result or click Open.
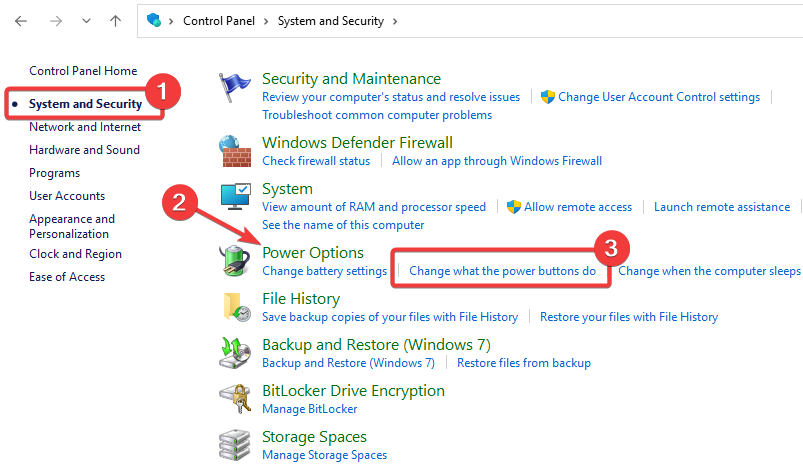
- The Control panel window will appear. Choose System and Security on the left navigation, then Power Options on the right and click Change what the power buttons do under it.
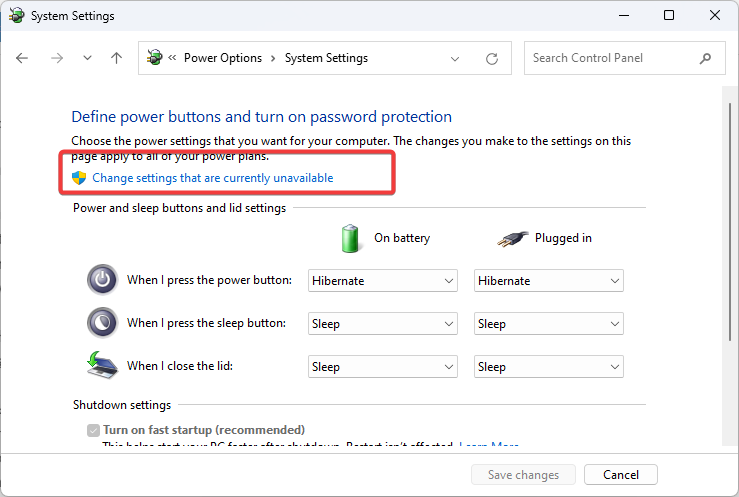
- Next, click Change settings that are currently unavailable.
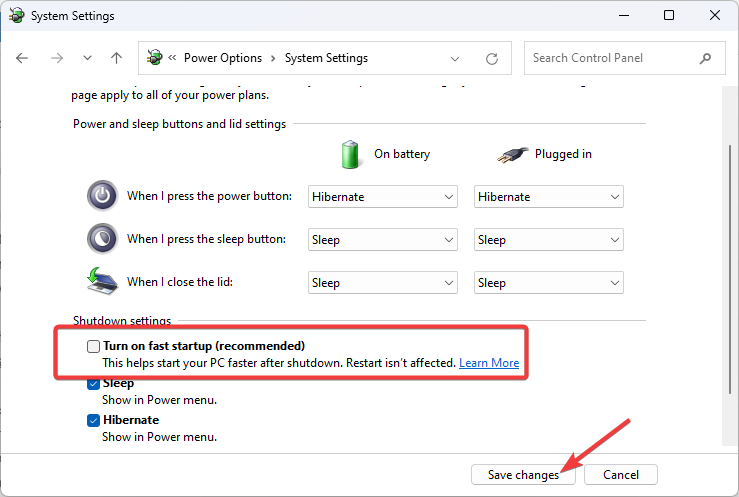
- Under the Shutdown settings, uncheck the box next to Turn on fast startup (recommended) and click Save changes.
5. Run SFC and DISM Commands
- Press Windows + R shortcut keys, type
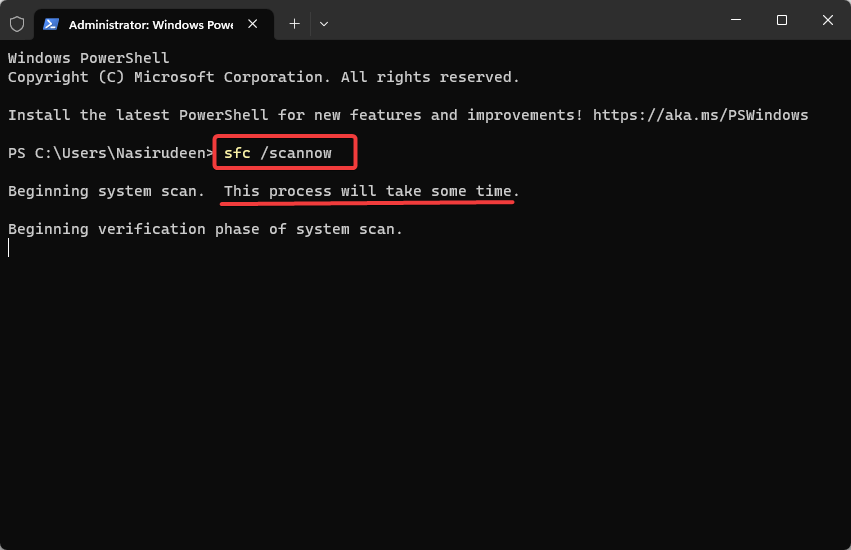
cmdinto the Run box and hit OK. - Windows Command Prompt will open. To run the SFC scan, copy and paste – sfc /scannow – command and press Enter. The scanning may take a while.
- Next, to run the DISM scan, copy and paste the following command and press Enter –
DISM /online /cleanup-image /restorehealth.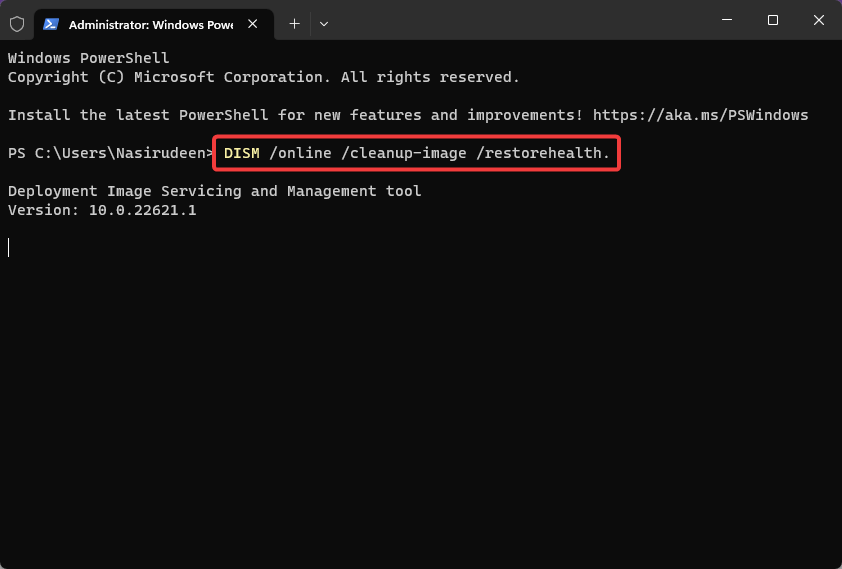
Running the System File Checker (SFC) and Deployment Image Servicing and Management (DISM) might help fix Windows 11 abrupt shutdown if it’s related to corrupt, damaged or missing system files.
6. Perform System Restore
- Press Windows Key + R to open the Run dialogue box, the type –
rstrui– and the command box and hit OK.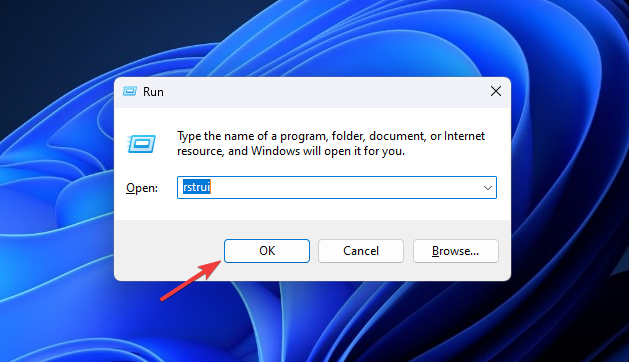
- The System Restore wizard will open. Click the Next button to proceed.
- Select a restore point from the available options and click the Next button.
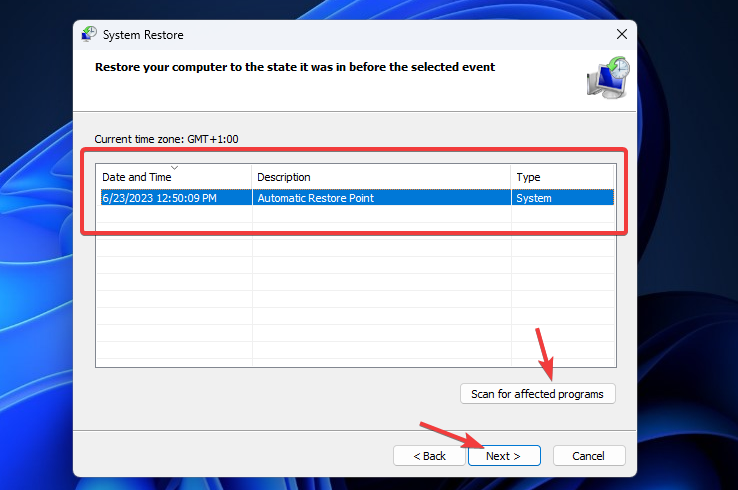
- On the next screen, click the Finish button to initiate the system restore process. It may take some time to complete.
- Once done, your computer will automatically restart.
If you notice unexpected shutdowns after you update, install software, or change some settings, performing a system restore should fix it.
A system restores help reverts your PC to a previous state. So any changes causing the problem are resolved.
If Windows continues the abrupt shutdowns after trying the fixes above, you can use the Windows event viewer to check the shutdown log and find out what’s triggering it.
The Windows event viewer keeps a record of every activity on your PC.
7. View Shutdown log in Event Viewer
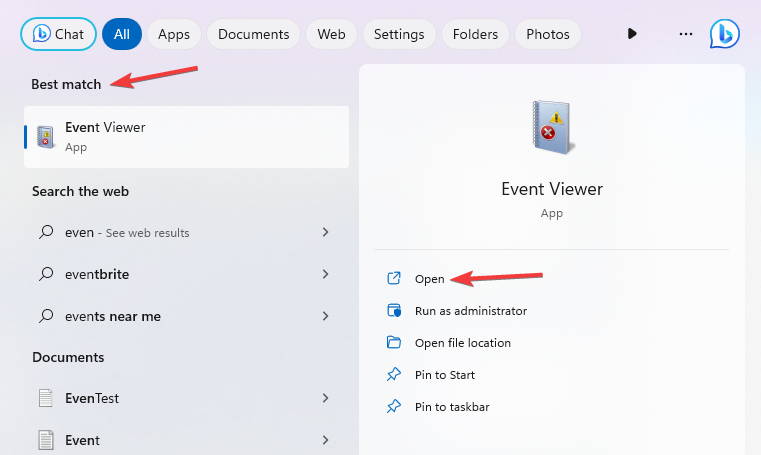
- Type Event Viewer into the Windows search bar and select the Best match result. Or Click Open under Event Viewer.
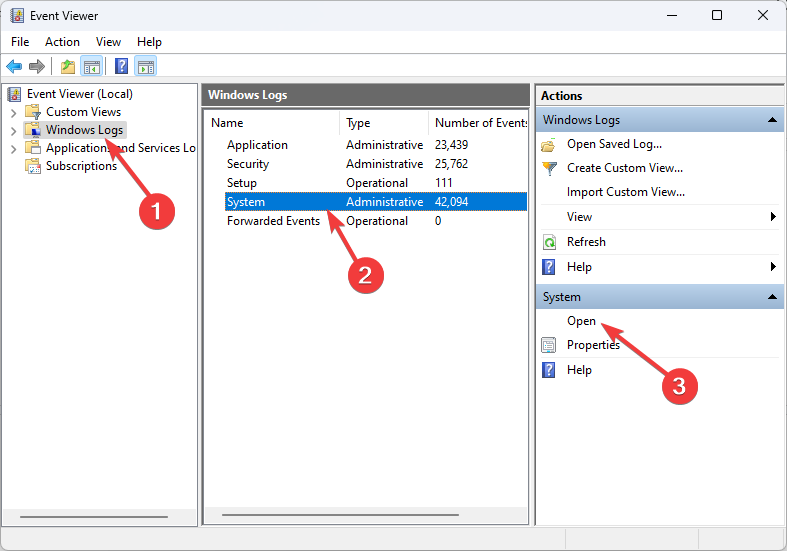
- Click Windows Logs, then go to System and select Open.
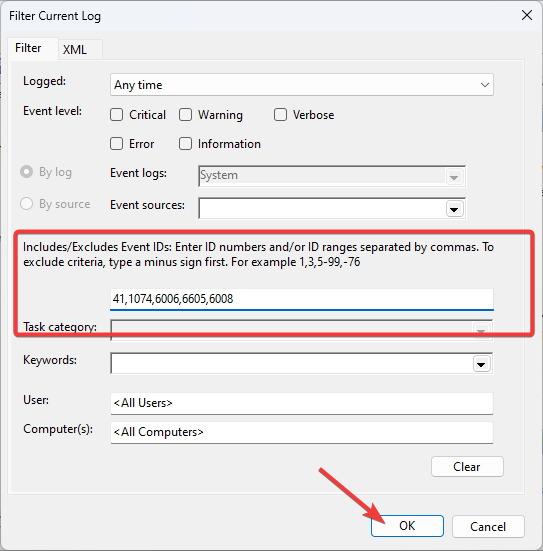
- After that, select Filter Current Log under System on the right.
- On the next window, go to Includes/Excludes Event IDs field, type in the following Event IDs, and hit the OK button – 41,1074,6006,6605,6008. These are Event ID numbers related to Windows shutdowns.
- Once you hit OK, all the shutdown logs will appear. Scroll through the log, paying attention to those labeled Critical and Error. Check the General tab under the log for details of the shutdown event.
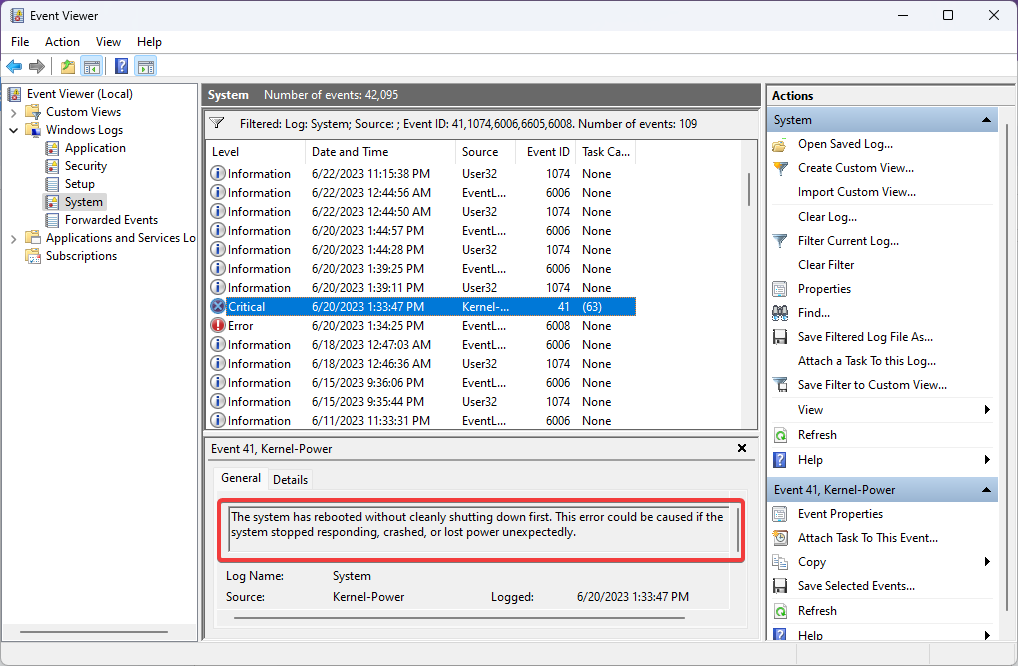
The Shutdown log will give you an idea of when and why shutdown occurs on your PC. Using the information, you can work on stopping windows from shutting down automatically for no reason.
No More Random Shutdowns on Windows 11
There you have it. 7 ways to deal with random shutdowns on your Windows 11 device. Remember to start with checking for overheating, as that’s the leading cause. We hope one of them works for you.
And once you resolve the problem, always keep your PC temperature in check to prevent abrupt shutdowns in the future. You have the tips above.


