No more lost chat. ChatGPT now to-saves conversation history. But beyond that, you can now save your ChatGPT history, download and share them with the world.
Want to use your ChatGPT conversation elsewhere? Or do you simply want to keep track of your ChatGPT history and data?
It’s no news that ChatGPT has a chat history feature where conversations are stored and can be retrieved.
While this feature offered the ease of saving and accessing conversations within its web application, a major limitation existed—you cannot export or download, not to talk of sharing your ChatGPT conversations.
Users had to resort to workarounds like screenshots and the old-school copy-n-paste technique to get hold of their chat history.
Today, there are better, faster and user-friendlier ways to save, export and share your ChatGPT conversation.
From the newly introduced ChatGPT export feature to the rise of ChatGPT browser extensions, let’s see how you can easily export and share ChatGPT conversations.
In this article:
How to Export ChatGPT History With the Native Export Feature
Recently, OpenAI, ChatGPT’s parent company, announced new features to give users more control over their data.
One of these major updates is the ability to export chat history and data.
This feature allows users to transfer and store their ChatGPT conversation elsewhere, avoiding the possibility of ChatGPT history being lost or inaccessible when needed.
This new feature allows users to preserve their ChatGPT prompt/response history and refer to them whenever needed.
Whether you are a ChatGPT free or plus user, exporting your ChatGPT history is very straightforward.
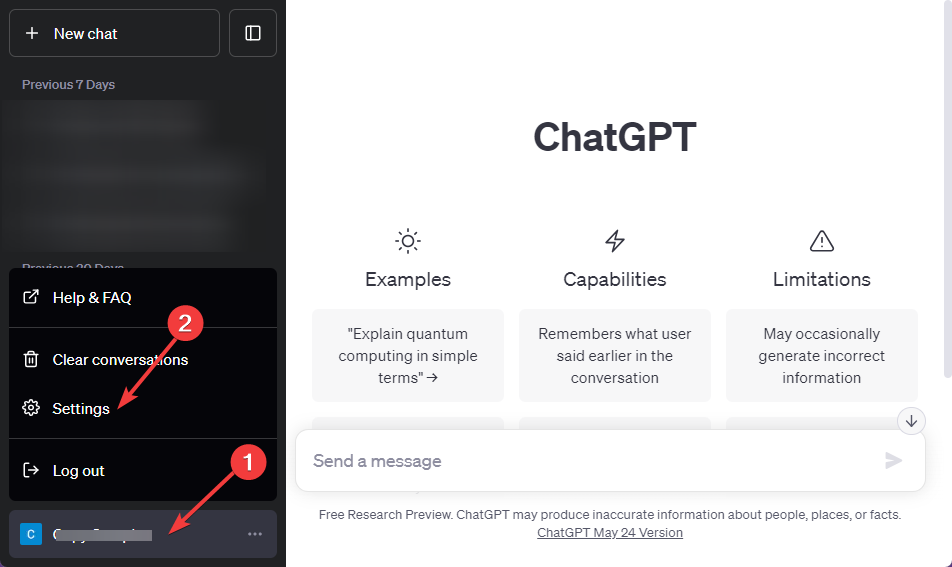
- Sign in to your ChatGPT account, click on your Profile Name at the bottom of the left sidebar and choose Settings from the resulting menu.
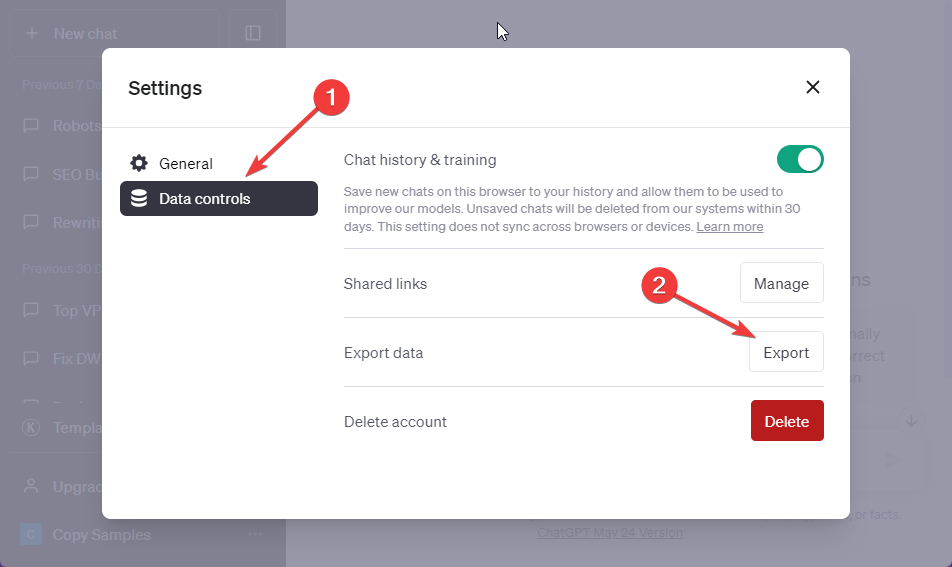
- The Settings window will appear. Switch to the Data controls tab, then click the Export button next to Export data.
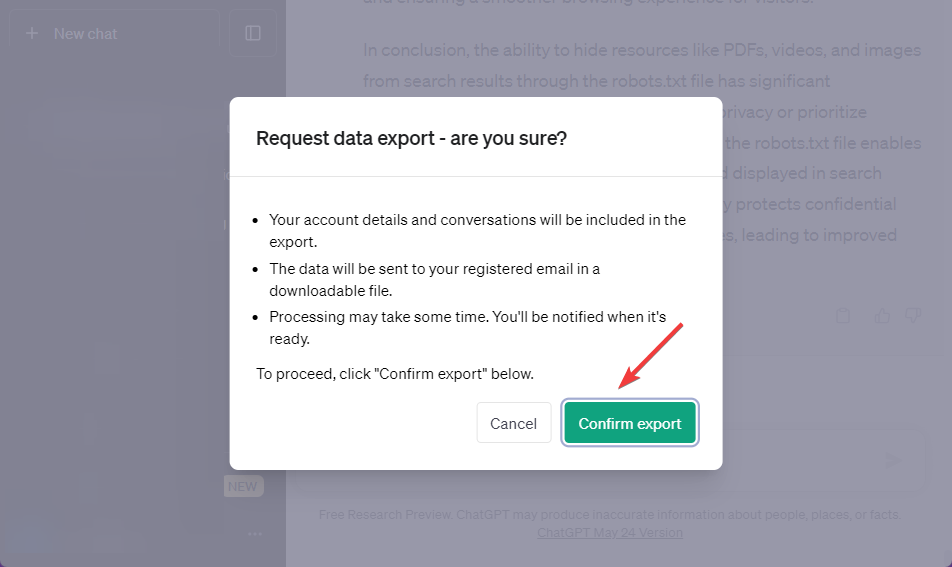
- A dialogue will pop up to confirm the data export request. Click the Confirm export below it to proceed.
- The data export process may take some time to complete, depending on the volume of data you have. Once done, you’ll see a notification that reads – Successfully exported data. You should receive an email shortly with your data.
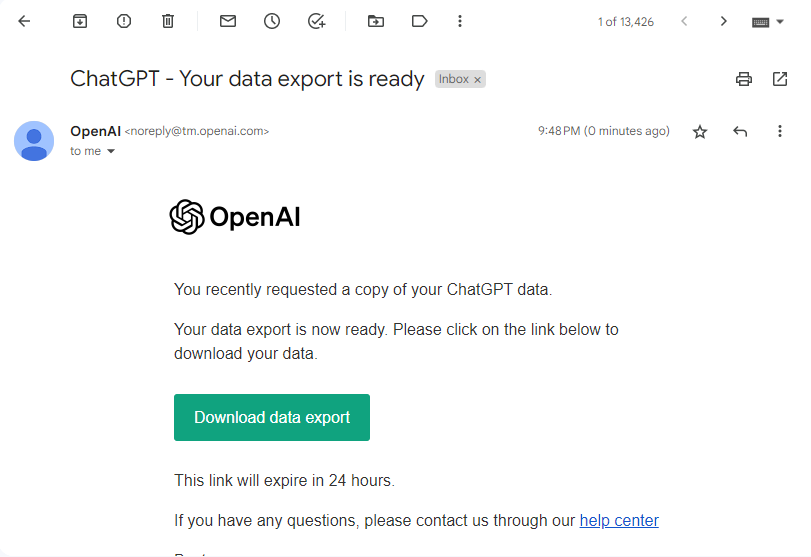
- Next, go to your registered email. Open the mail from OpenAI and click the Download data export button.
- Your ChatGPT data will download as a ZIP file. Once you extract it, you’ll find a JSON version of your conversation logs. The content is your ChatGPT/Responses.
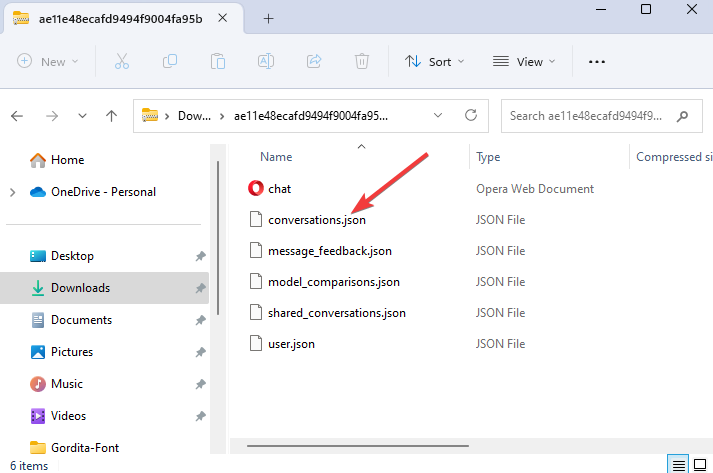
And that’s how to export your ChatGPT history and data successfully.
It’s important to note that the download link expires after 24 hours. So it’s crucial to download the data before it expires. Else, you’ll have to repeat the process.
Another easy way to save ChatGPT chat history is to copy and paste it into a Google Docs file manually.
The native option above allows you to share and export your entire chat history, which is not the best if you want to save individual conversations.
So this method is ideal if you have a few chats to save.
Here’s how to save and share ChatGPT conversations manually:
- Open the chat you want to save and highlight the text from the top to the bottom.
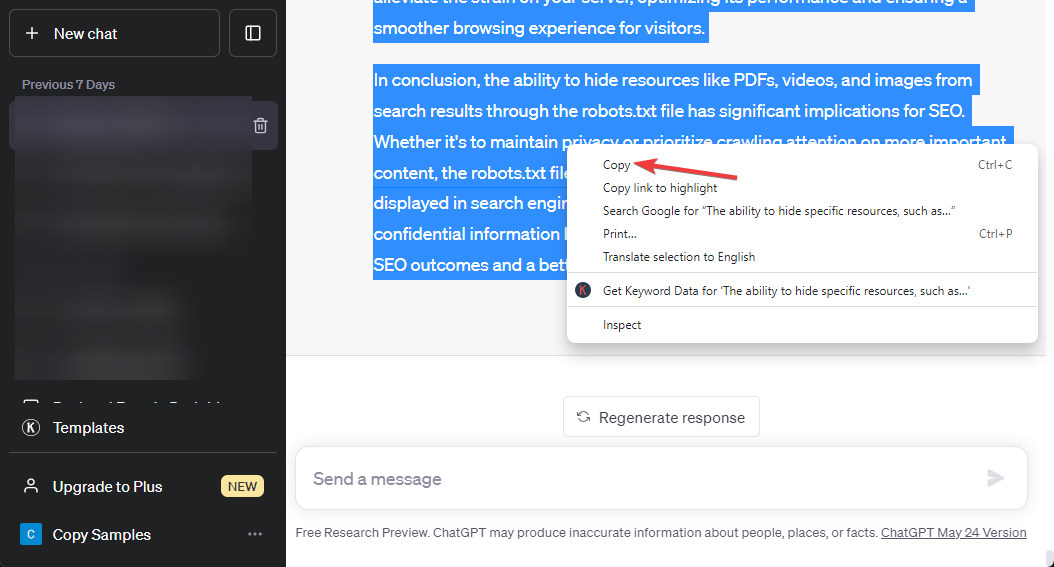
- Once you highlight the entire text, press Cmd + C (for MacOS) or Ctrl + C (For Windows PC) on your keyboard, or you can right-click and select Copy from the menu to copy to your clipboard.
- Next, open a Google Docs file and press Cmd + V (for MacOS) or Ctrl + P (For Windows PC) to paste the entire chat, or simply right-click on any blank section of the page and click Paste.
- Name your file, and you can now share your ChatGPT conversation as a Google Docs file with anyone.
The easiest and best way to save, share and export your ChatGPT chat is to use a browser extension.
But before we show you how to do that, let’s look at the 3 most reliable extensions. They are more than just a ChatGPT history downloader.
1. SaveGPT
Available for both Chrome and Firefox, SaveGPT is a free extension that adds a Chat History button to the top-right corner of the ChatGPT web app.
The extension uses your browser storage to store data, and anytime you need to retrieve past conversations, simply click the Chat History button. Save ChatGPT is free.
- Download ChatGPT conversations into PDF, Text, and Markdown files.
- Save the conversation to your desired location
- Use the copy button to copy the text to your clipboard.
2. Superpower ChatGPT
Superpower ChatGPT is another popular ChatGPT history saver with over 100,000 active users.
It automatically syncs a copy of all your chats to your computer.
Superpower ChatGPT is a robust chat management tool with lots of great features.
- Organize your chats in folders and assign a different color to each folder.
- Drag and drop files to reorder or add/remove them to folders.
- Export your chats into different formats(.txt, .json, .md).
- Pin important messages in each conversation to the navigation sidebar
- Timestamps for all chats.
- Easily change the model(GPT-4, GPT-3.5, etc.) in the middle of the conversation.
- Add as many custom prompts as you like and share them with a single click.
3. ChatGPT Prompt Genius
Formally ChatGPT history, ChatGPT Prompt Genius is a great tool for saving ChatGPT chat history locally to your device.
This free, open-source browser add-on allows you to share, import, and reuse your best prompts in ChatGPT.
To use ChatGPT Prompt Genius, you must first install it from Chrome Web Store.
After that, simply login into ChatGPT and start the conversation with the extension enabled.
Here are some of its amazing features:
- Sync chat history locally for easy access and searching.
- Save chats as markdown, HTML, PDF, or PNG.
- Customize ChatGPT with themes.
- Discover, share, import, and use the best prompts for ChatGPT locally on your device.
- Access history and prompt templates with a click.
- Visit Chrome Web Store to install the ChatGPT Prompt Genius Extension.
- Once installed, activate the extension and log in to your ChatGPT web app. If you are already logged in, reload the page.
- Next, ChatGPT Prompt Genius will add new menus, such as Share & Export, Theme Settings and New Prompt to the ChatGPT sidebar.
- Start a new chat or select an existing one from the chat history sidebar.
- Once the chat loads, select Share & Export at the bottom of the sidebar.
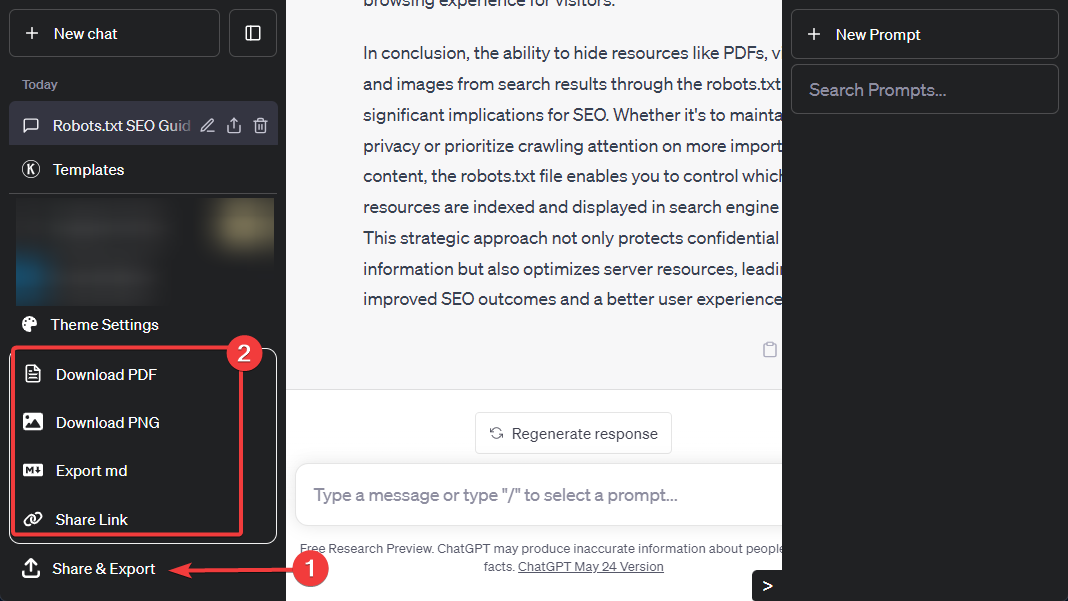
- Select an option to share or export your conversation from the resulting menu.
Frequently Asked Questions (FAQs)
How Long Does ChatGPT Hold Chat History Data?
ChatGPT holds your data as long as your account is active. But, if you turn off your chat history, the conversations will only be held for 30 days, after which they will be permanently deleted. Be aware that chat history won’t appear on the ChatGPT sidebar by turning off this feature.
How Do I Share Chat on ChatGPT?
With the new Share Link to Chat feature in ChatGPT, sharing your conversation has never been easier. Go to the chat you want to share on the sidebar. Click the share icon on it. ChatGPT will generate a link for the chat. Simply copy and start sharing with your friends and colleagues.
How Do I Clear ChatGPT Conversations?
To clear your ChatGPT conversations, click your Profile Name at the bottom left of the ChatGPT sidebar. Select Clear conversations, then Confirm clear conversations next. Your entire chat history will be cleared.
Exporting your ChatGPT history lets you save and keep a copy of your conversations outside the ChatGPT platform.
It’s like having a backup so you don’t lose those awesome discussions.
We’ve shown you how to save and export your ChatGPT conversation history using different methods.
And even now, you know how to share your chat with friends and colleagues.
We hope you find this guide helpful. Share your thought in the comment section below.


